
by Thomas Rectenwald, Sr. Cloud Solutions Lead
As of December, 2018, Amazon has released Client VPN Endpoints, allowing us to do away with Amazon EC2 instance-based VPN solutions.
Historically, AWS has had VPN functionality. However, this has been focused on site-to-site IPSec tunnels that connect static locations, such as corporate offices or data centers to the cloud. If we wished to establish a TLS based VPN where the client endpoint could be anywhere, we’ve had to setup an EC2 instance based solution. That’s where Client VPN Endpoints comes in.
The list of features is impressive:
- Fully managed service from AWS. No instances needed.
- HA at the regional level and autoscales based on number of users.
- Granular authentication with AWS Directory Services (Active Directory).
- Authentication can also be done via client-side certificates.
- Pairs up with Amazon Certificate Manager (ACM).
- CloudWatch Logs integration.
Pricing details can be found here.
How to Use VPN Endpoints
Prerequisites
- An existing VPC that you wish to connect to.
- An existing AWS directory service (unless using Mutual Authentication only):
- Simple AD
- Managed AD
- AD Connector
- A Security Group that will control data sent through the VPN.
- A VPN client installed on your workstation.
Generating Certificates
AWS Client VPN requires that a certificate is generated and uploaded to their Amazon Certificate Manager (ACM) service. We cannot create a certificate in ACM via the console. Amazon provides detailed steps on how to do this using easy-rsa, an open source tool that simplifies the process of building a certificate authority (CA). We’ll need to run through these steps before proceeding with anything else: Client Authentication and Authorization
While working through that document, here are some notes:
- The AWS Client VPN services supports two types of authentication. These can be used together or individually:
- Mutual Authentication: A connection is authenticated by a client certificate stored on the user’s workstation. This negates the need to have a user and password setup, and thus access to Active Directory. If you are not running AD this is an appropriate option. If you are running AD, but wish to have additional security, this can also be setup in conjunction with AD authentication.
- Active Directory Authentication: This is done through Amazon’s Directory Service. You can choose from Simple AD, Managed AD, or AD connector if you have an existing environment that you wish to connect to.
- While working through the steps to generate and upload your certificate, note that creating and uploading a client certificate is only required if using Mutual Authentication. The server certificate is needed for both methods.
- The name of your certificates is arbitrary. The service does not connect to “
client1.domain.tld", there is no need to involve Route 53. Connections are made to a dynamically generated, random address stored in the VPN configuration file.
Once done generating and uploading your certificates, we’re ready to proceed with creating the VPN.
Create the VPN Endpoint
Assuming the above prerequisites are met, we can now get started:
- Log on to your account via the AWS console.
- Browse to VPC | Virtual Private Network (VPN) | Client VPN Endpoints
- Click on the Create Client VPN Endpoint button.
- Fill in the form as follows:
|
Parameter Name
|
Type
|
Description
|
|---|---|---|
| Name Tag | Text Input | Optional. Creates a Name tag. |
| Description | Text Input | Optional. Creates a description. |
| Client IPv4 CIDR | Text Input | Range to allocate for client IPs.** |
| Server certificate ARN | Drop Down | ACM Certificate generated and uploaded in the previous step. |
| Use active directory authentication | Check Box | Enable and select an existing directory service if using AD Authentication. |
| Use mutual authentication | Check Box | Enable and select the client certificate if using Mutual Authentication. |
| Do you want to log the details on client connections? | Radio Button | If Yes, sets up a CloudWatch log group and stream. |
| DNS Server IP 1/2 IP address | Text Inputs | Optional. Can point to your AD controllers or internal Route 53, etc. |
| Transport Protocol | Radio Button | UDP or TCP. UDP is preferred and faster. |
** The VPN range must be between a /16 to /22 network and should not overlap with other ranges within the VPC. For example, if the VPC is set to 10.0.0.0/21, we could set this to 172.168.0.0/22 to ensure clear separation of networks.
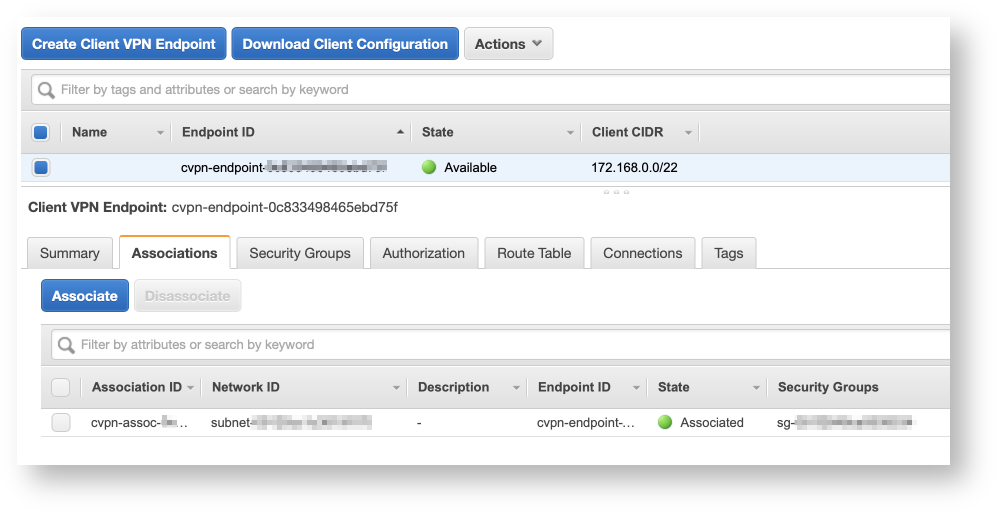
Associate with Target Networks
Once the endpoint has been created, it’ll be in a Pending-associate state. We can resolve this by starting to associate the endpoint with a VPC, and subnets within:
- Click the Associations tab.
- Click the Associate button.
- Select the VPC and subnet you which to associate with.
- Rinse and repeat the above for all networks you’d like to access through the VPN.
Associating networks will take some time. Once done all states should be green.
Security Groups
When an association is created via the console, it is setup with the default VPC security group for the VPC is resides in. This is rarely desired so we’ll want to change that:
- Click the Security Groups tab.
- Click Apply Security Groups.
- Apply any security groups as desired. You will likely want to create one as a prerequisite.
- This will replace the default group. You may need to tab in and out to see the change.
Setup Authorizations
Authorizations control what users can access the VPN. This can be all users, or if using AD, granular based on groups.
- Click on the Authorization tab.
- Click Authorize Ingress.
- The Destination network to enable field, enter the CIDR for a subnet, VPC, or group of VPCs depending on how restrictive you want to get.
Route Tables
When an association is created via the console, a route is created to the subnet and can be viewed under the Route Table tab.
- This is added to the Default route table.
- Some do not use this. If you have your own tables defined, you can delete this and apply by other means.
Going Live
At this point, we’re ready to test things out. Here, Amazon let’s you go into Easy Mode by providing the client configuration for download:
Download and Apply the Configuration
- Click on the Download Client Configuration button.
- This configuration uses the OpenVPN standard and can be applied to multiple clients, including:
- Pritunl
- OpenVPN
- Tunnelblick (My favorite, MacOS only)
- And many, many more.
- At this point, if you are using AD authentication only, you are done. Simple apply the file to whatever client you are using, typically via a double-click or drag-and-drop.
- Note, you may need to rename the file extension from
*.ovpn.txtto*.ovpn.
- Note, you may need to rename the file extension from
Extra Steps for Mutual Authentication
- If you are using Mutual Authentication, you’ll need to add the client certificates to the configuration when distributing:
- Create a directory.
- Copy the client key and certificate created earlier into that directory.
- Copy the VPN client configuration files into the directory.
- Append the following lines to the end of the configuration file:
- If you’ve used a different name for your key and certificate, replace
client1.domain.tldwith the actual name. - An example of the above steps (do not cut and paste verbatim):
- Bundle up this directory, perhaps as a ZIP archive and deploy to your clients.
Conclusion
The AWS Client VPN service provides an easy to setup, fully managed, highly available, “serverless” solution for client VPN’s on AWS. It’s ability to integrate both with active directory and through client certificates is flexible and welcome. There are a few limitations to be aware of:
- Split-tunnel VPNs are not supported.
- My hopes are that this will change in the future.
- Note, if you want to have internet access available when connected to the tunnel:
- Ensure that the subnet you are associated with has an internet gateway.
- Create an authorization ingress for
0.0.0.0/0. - Add the
0.0.0.0/0destination to your route table.
- There is no support for IPv6.
- We can only associate one subnet per availability zone within a VPC.
All in all, the service works excellent and has been a long time coming.
6 Comments
Esther
April 25, 2019
Hello! Just in case you find yourself in the same trouble, when you are configuring your VPN with “mutual authentication”, at the client certificate you have to select the server certificate (yes, twice) to go on; then, just add the configuration of the client certificates as described in the post.
https://docs.aws.amazon.com/vpn/latest/clientvpn-admin/cvpn-working-endpoints.html#cvpn-working-endpoint-create
Thomas
May 9, 2019
Good to know. Thanks for pointing that out!
Tyler
May 9, 2019
Hello – do you know if it’s possible to use Client VPN to restrict access to an AWS Classic Load Balancer?
Thomas
May 10, 2019
Hi Tyler,
The Client VPN associates with subnets on the AWS side, and can also use security groups for further granularity and access. So yes, that should be possible.
My guess is you’d want to place the LB in a private subnet if it isn’t already, then setup the client VPN to associate with the subnet it is in. Finally, add rules to the ELB’s SG that grants access from the VPN.
Amazon will always assign a public resolvable DNS name to their load balancers, even if internal. You may need to ensure the client VPN tunnel has outbound access to the internet through AWS to resolve that.
Hope that helps, let me know how it goes or if you run into any issues!
Arman
July 29, 2019
Hi, thanks very much for this walk-through! I followed all the steps through the end and imported the OVPN file into Tunnelblick, but after I connect successfully I lose complete access to the internet, even though I unchecked the ‘route all ipv4 traffic through vpn’ checkbox. Any idea what could cause this?
Thomas
August 23, 2019
Hello Arman,
Initially, the AWS Client VPN solution only supported full-tunnel VPNs. Thus, in order to obtain internet access using that setup, you need to configure it to access a route table containing an internet gateway.
On July 24th, 2019, Amazon announced support for a split-tunnel VPN, which allows only specific traffic to flow through the VPN and leaves other traffic, such as general internet access alone. This is a big deal, as a split-tunnel VPN is usually favored unless there are specific security requirements that call for a full-tunnel.
Let me know if you run into issues using either approach (full-tunnel with an IGW or split-tunnel). I’ll be glad to assist. Note, I also plan to update this blog post with the relatively recent split-tunnel news shortly.